Strava is the undisputed No 1 training tracker and athletic social media app. It is designed for Cyclists and runners and is used pretty much equally by both.
In this guide I’m going to focus on its use by cyclists.
Strava is cloud based so can be used by PC and Mac users via their browsers and there are also apps for iOS and Android.
Strava Free includes everything the keen cyclist could want. If you want to take your training to an advanced level by connecting devices such as power meters and heartbeat monitors you’ll want to pay for a Summit (Premium) account.
Here are some statistics that demonstrate Strava’s enormous success since it was founded in 2009:
- 25 activities uploaded every second, 15.3 million every week
- 300+ compatible mobile phones and GPS devices
- 165+ employees, most in San Francisco with more in Denver, Hanover and Bristol
- 1,100+ professional members are on Strava
- 1 million members join every 30 days
- More than 32 million Strava members upload activities from 195 countries
- 3 billion kudos given between members last year
- Over 4 million photos shared per week on Strava
- 85 million comments and Kudos given by Strava members per week
- $7.99 a month to make the most of your sport with all 3 Summit Packs, or $59.99 a year
- 130+ cities making commuting better with Strava MetroStrava year in sport 2018
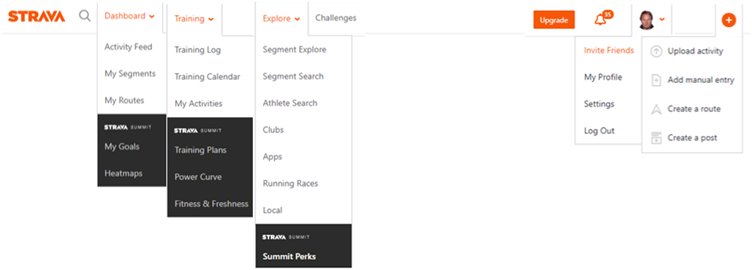
The Strava Main Menu Layout
Dashboard Tab
- Activity Feed (Free)
- My Segments (Free)
- My Routes (Free)
- My Goals (Summit Training Pack)
- Heatmaps (Summit Safety Pack)
Training Tab
- Training Log (Free)
- Training Calendar (Free)
- My Activities (Free)
- Training Plans (Summit Training Pack)
- Power Curve (Summit Analysis Pack)
- Fitness and Freshness (Summit Analysis Pack)
Explore Tab
- Segment Explorer (Free)
- Segment Search (Free)
- Member Search (Free)
- Clubs (Free)
- Apps (Free)
- Running Races (Free)
- Local (Free)
- Summit Perks (Summit All Packs)
Challenges Tab
- No sub menu
Right Hand Menu (Click on Avatar)
- Invite Friends
- Settings
- My Profile
- Log Out
Right Hand Menu (Click on the + Sign)
- Upload Activity
- Add Manual Entry
- Create a Route
- Create a Post
Dashboard Tab > Activity Feed (Free)
The Activity Feed is your home page
In the centre of the page is your main feed which shows your rides as well as the shared rides of the people you are following. You can toggle between this and just seeing your own activities using the dropdown at the top of the feed.
From here you can leave Kudos (Thumbs up) and Comments (Notepad Icon) on the rides of people you are following.
On the activity feed page you will also see your KPIs, Challenges, Clubs and Your Privacy Settings control panel as well as a list of suggested friends.
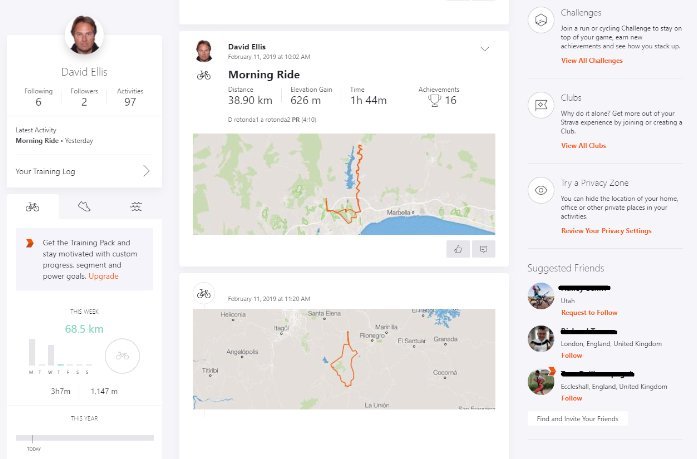
Clicking on the title of a ride takes you to the ride overview screen
The Ride Overview Screen
Click on the title of an activity and you are taken to the overview screen which shows KPIs for the ride (click on the “show now” button to reveal the calories burned estimate and elapsed time for that ride) plus achievements, a map of the ride, an elevation chart and your segments.
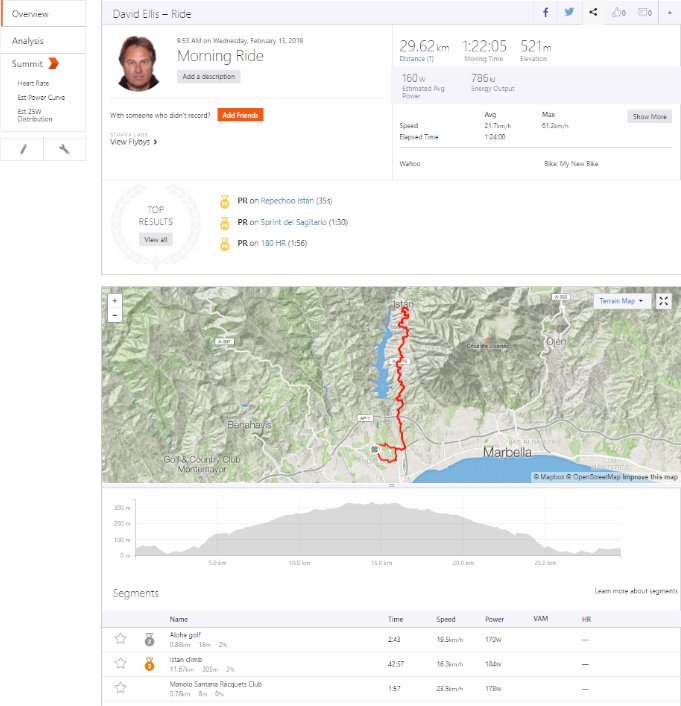
The Ride Overview Screen has links to:
- Flybys (An Interactive map of riders who where near to you)
- The Analysis Screen
- Summit Heart Rate Screen
- Summit Est Power Curve Screen
- Summit 25W distribution Screen
- A Pencil Icon: Allows you to manually edit this activity
- A Spanner/Wrench Icon: A submenu of useful tools
Clicking on the spanner/wrench icon takes you to this submenu:
Create Segment: Once a segment is created, any Strava member who records an activity over that same stretch will have a log of their previous times, when they achieved them and how they compare to other members’ times. You can also create private segments that remain invisible to others and only record their personal times.
Public segments are for the whole Strava community to enjoy. If you ever decide to delete your account public segments you create may remain.
Flag: Advise Strava about problem with this activity eg: Bad GPS.
Crop: Reduce Map Image area. The portion of your activity highlighted in blue on the map will be kept, and the red portion will be removed.
Split: Choose to split this activity into two or three unique activities. Then use the slider to select where you want to split.
Delete: Delete this activity.
Create Route: Convert this activity into a saved route.
Export GPX: Download this activity as a GPX file
Refresh Activity Achievements: The Refresh My Achievements tool can regenerate your achievements for any activity if they do not appear or are wrong.
There are several reasons you may want to refresh your achievements. For example, when switching activity type you can lose your achievements. You may also be missing achievements from segments that were hidden and you've now unhidden. This tool is only available on the web version of Strava not the app.
Add friends to this ride (Orange Button)
You can add friends that were with you and didn't record this activity. They will be able to save it to their own profile. Privacy zones on your activity will be maintained.
The Segment List on the ride overview screen has these columns
Star: If this is a starred segment or not.
Award: Achievements awarded.
Name: The name given to this segment.
Time: The total time of your ride.
Speed: The average speed of your ride.
Power: Power reflects the average value of your output during a complete ride and takes coasting into account. (Power is an important measure of how much energy you are exerting onto the pedals).
Average power is expressed in Watts and is most accurately measured with a power meter, though if you don't have a power meter Strava gives an approximation of your power using the power estimator.
This estimation doesn’t allow for wind and air pressure which can make a big difference and a way round this is to export your results to Golden Cheetah which has a more accurate power estimator..
VAM: VAM indicates your Vertical Ascent in Meters/hour. It shows how quickly you are traveling upward. VAM is useful for comparing your effort on different hills and segments, and is used by both cyclists and runners.
To get a high VAM score, grades between 6-10% are best as they are usually steep enough to avoid wind, and gradual enough to allow unrestricted motion.
HR: This is your Heart rate measured using your heart rate monitor if you have one.
You can Analyze your segments by clicking on one to open this drop-down
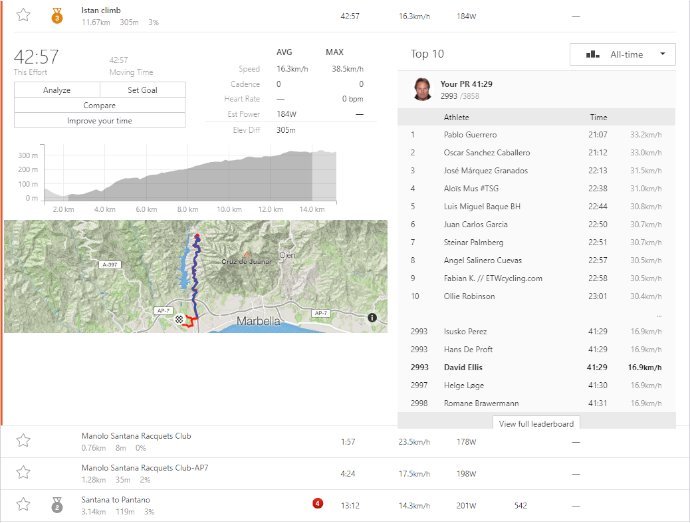
You can filter the top 10 using drop down by:
- All Time
- This Year
- Men
- Women
- I’m following
- My Results
Analyze: Click on this to analyze this segment and show other segments
Set Goal: Set your personal goals – requires the Summit Training Pack
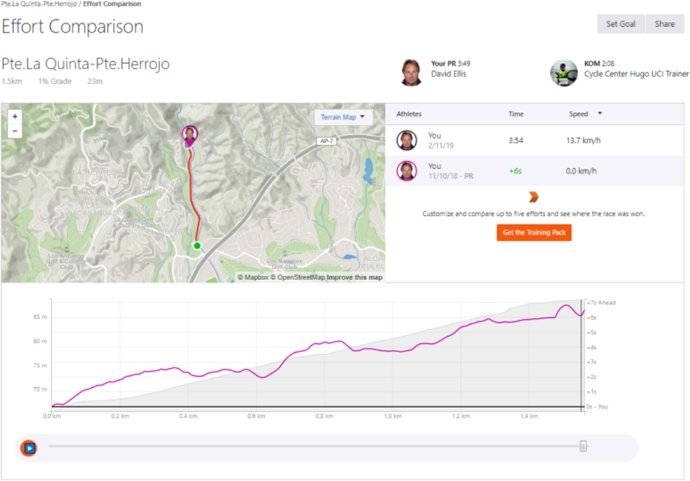
Compare: compares your performance in this segment with the top member
Improve your time: takes you to training plans (Requires the Summit Training Pack)
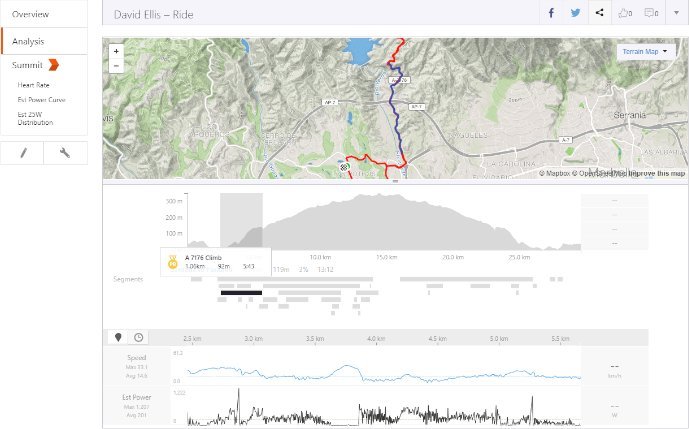
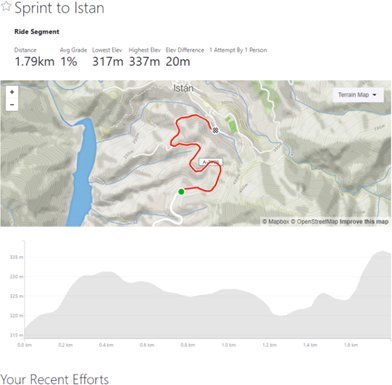
Segment Analysis Screen
You get to this screen by clicking on a segment in the ride overview screen, this opens a dropdown as shown below.
Dashboard Tab > My Segments (Free)
Strava users can create segments to mark the most interesting parts of their cycling and running routes. (Or you can use public segments created by other Strava users).
Segments need to have three things: a start point, an end point, and a sequence of waypoints (locations) in between.
To create a segment the data has to already exist on Strava exactly the way you want to create the segment. You begin by viewing an existing activity in Strava.
You will see all the existing segments and at the bottom there is a button titled “Create New Segment” Click on this
You'll then see the segment creation interface, where you can specify the start and end using the green and red sliders above the map.
As you drag the sliders forward and back, the map updates the position of the green start marker and the red end marker.
For single step adjustments, you can use the buttons labeled "back" and "forward" below the left and right ends of the slider.
When you are happy with the start and end points, click "Next." Strava checks to see if a similar segment already exists.
After clicking "Next," again, you can name the segment. Try and use a name that describes the segment so that it will be recognizable by other members. Maybe include the name of a landmark or use a local nickname.
Finally, decide if you want to make the segment private so that only you will see the segment and only your results will be shown.

My segments can be found under the Dashboard Tab Menu tab
Click on the segment name on the Created Segments tab to open the Segment analysis page. Click on the star outline next to the name if you want to make this a Starred segment (the star will turn orange).
It will then appear under the starred segments tab and in Live Segments if you have the Summit Analysis Pack
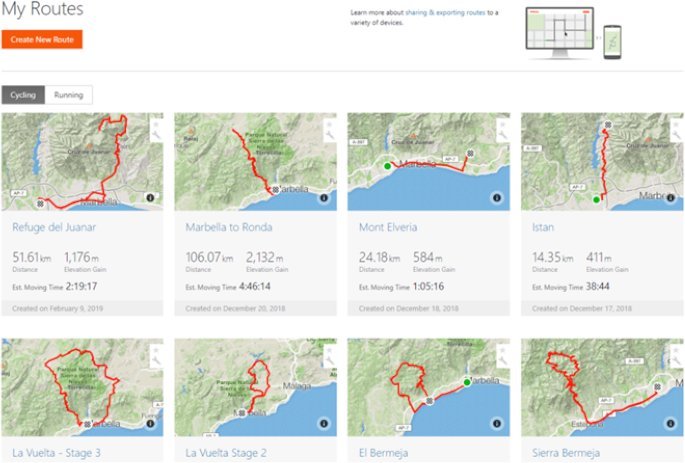
Dashboard Tab > My Routes (Free)
A route is a map of a ride that you can create in advance using the Strava route planner, you can also convert an existing saved ride into a route that you can share.
If you find someone else’s route you like on Strava you can copy it. Just go to the ride, click on the wrench, and choose create route. Note: This feature is only available for someone else's activities if their privacy settings allow it.
If you use Strava on a Smartphone you’ll see the route but there will be no turn by turn instructions or audible prompts, for that you need a compatible bike computer such as a Garmin.
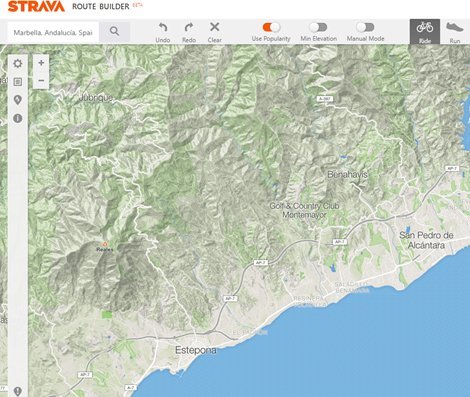
Creating Routes
To create a new route from scratch with Route Builder, click the 'Create New Route' button near the top of the My Routes page. You can let Strava join waypoints using criteria such as popularity, or minimum elevation.
Additional options can be found across the top of the page and in the side panel. Select the (i) icon for detailed information and to view the tutorial.
Using the Global Heatmap in Route Builder is a great way to discover new routes. Select the gear icon and toggle the option for Global Heatmap ON.
Before you save your route, you can make it 'Private.' So only you can see it, you can convert a private route to public at any time by editing the route, unchecking the private checkbox and clicking 'Save.'
Remember that Strava Route Builder is restricted to our current basemap. That means that if the original activity doesn’t match Strava's basemap of existing route data then you’ll get an error.
Managing your Routes
To access routes you've created and starred hover over your Dashboard Tab tab and select My Routes from the drop-down menu.
You can Star routes (By clicking the Star Outline next to the Ride Name/Title) created by other members to save them to your routes page.
To edit or delete a route, click the wrench icon located under the route star and select the appropriate option from the drop-down menu.
How Strava Calculates Estimated Moving time for a New Route
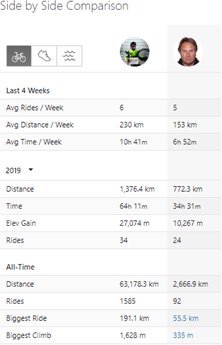
The estimated moving time for a Route is calculated from your 4-week average speed or pace. On your profile, you'll see your average distance per week and your average time per week based on your last 4 weeks of activities.
Strava takes that average to estimate your moving time for the Route. If you share the route, the estimated moving time will be adjusted based on the viewer's profile stats.
How to follow a route
You can export a Route to a compatible Garmin device by selecting 'Export' on the Route page.
- Download the TCX or GPX file depending on what your device will accept.
GPX files are best if you have base maps installed because it will display both a styled map and text-based directions.
TCX files are best when you don't have base maps installed. Save the downloaded file to your computer and plug in your GPS device so it's recognized as a USB drive.
- Open the "Garmin" folder on that drive and find the folder labeled, "NewFiles."
- Move your downloaded TCX or GPX file there.
- Once the file has transferred, you can disconnect your Garmin and look for the Route in "Courses" on the device.
- From the Strava app for iPhone or Android, create or star a route as explained above. Then, navigate to the record screen in the app. Click the route icon and from the list of routes select Use Route.
- This will load the route on the record screen for navigation.
- Tap the route icon again to switch or clear the route.
- If you need to head home early, the “Route Back to Start” feature will plot the best way back to the start of your activity.
If you don’t have a compatible GPS device, There are also handy printer-friendly cue sheets that you can print out and share.
Dashboard Tab > My Goals (Summit Training Pack)
Weekly Progress Goals
You can set time or distance goals and track your progress every week.
Segment Goals
Push yourself to a PR! Set time goals for your favorite segments and deadlines to get there
Power Goals
Set power goals for specific time intervals. (For cyclists with power meters only).
Dashboard Tab > Heatmaps (Summit Safety Pack)
Summit Safety members can create their own personal heatmaps to visualize the ground they have covered. It’s the perfect thing to share with friends.
From your Profile on Strava.com, click on the Heatmaps tab:
- Pick your sport and date range for the activities you want included in your heatmap.
- Click Generate and your list of personal heatmaps will appear below.
- Click View to see your heatmap. Move to a region or zoom in to share that particular heatmap via Facebook and Twitter. You can share the URL with a smaller group of friends by email.
You can create unlimited heatmaps. Generate an all-time view of the year and compare it to previous years or set custom date ranges for your.
Training Tab > Training Log (Free)
The Cycling Training Log is designed to give you a full overview of your training history on Strava.
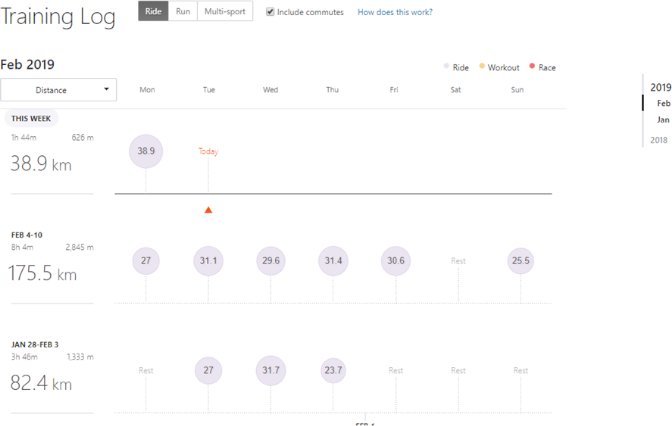
You can visualize your training by mileage, time, or elevation gain. Use the menu on the right to navigate to specific years or months.
You can hover over a circle to view the basic activity stats and click on it to drill down into the data.
The Circles represent rides in the Ride Training Log. All other activity types are classified as cross-training (XT).
By default your Strava training log is public. You can change it to private using the Private Button at the top right of the screen.
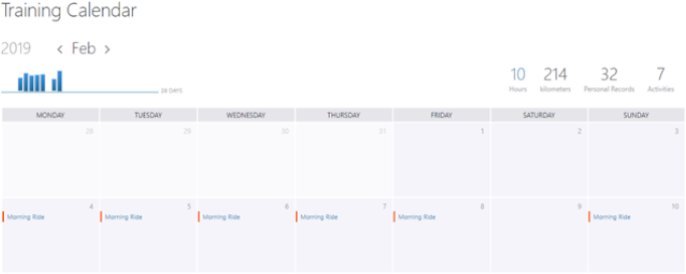
Training Tab > Training Calendar (Free)
The Strava Training Calendar shows your ride history and cumulative stats. You can click on the Links to open the ride details.
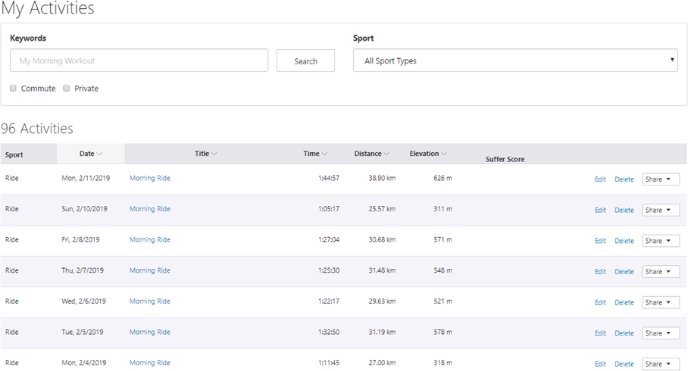
Training Tab > My Activities (Free)
The Strava My Activities screen gives you a simple, searchable list of all your activities. From this screen you can click on a title to go to the workout.
You can edit or delete the workout and share the workout on Twitter or Facebook, by email, or by embedding it on your blog or website.
Training Tab> Training Plans (Summit Training Pack)
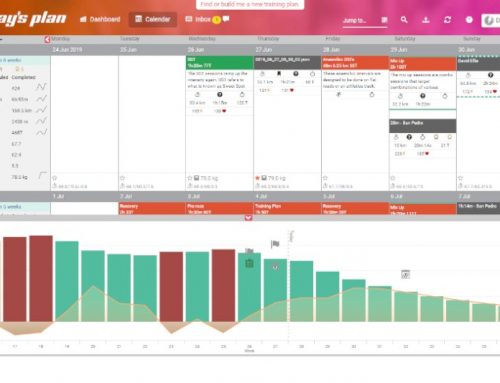
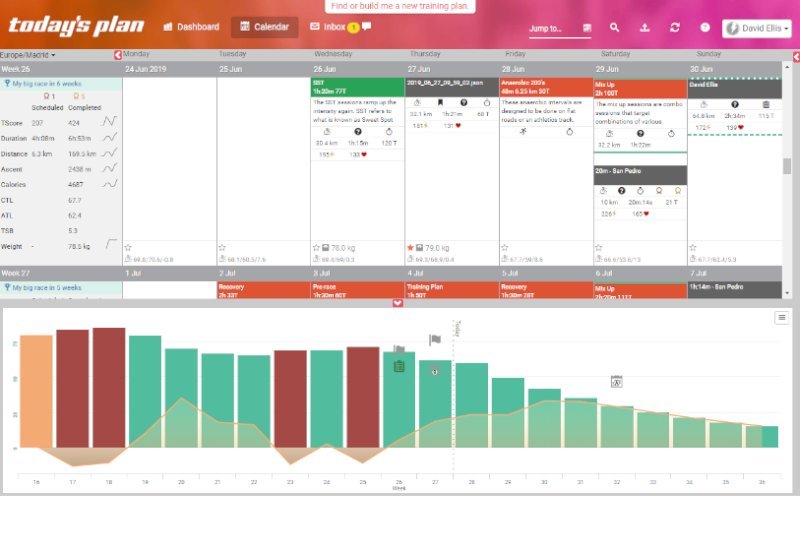
The Strava Summit Training pack includes 10 customizable 4-week training plans developed by expert coaches. Each plan lets you optimize your performance on a different type of segment.
All plans start on a Monday and end 4 weeks (28 days) later.
Each plan follows a 5-workout-per-week format, with workouts on Tuesday, Wednesday and Thursday, longer rides on Saturday and Sunday, and rest days on Monday and Friday.
You can customize your training plan based on the number of hours you’d like to train per week.
Workouts will be emailed to you on the afternoon prior to the workout.
Training Plans are currently offered in English, German, Dutch, French, Italian, Brazilian Portuguese, and Spanish.
How should I choose a plan?
Selecting a plan is easy; the plan times are based on current ability and not target time. If you've got a segment in mind, look at your most recent efforts. Choose the plan that best matches your recent or best average times. For example, if you typically climb a local hill in 5:30, you should probably choose the Six Minute Climb plan option to help you improve.
Click here to access Cycling Training Plans or find them under the Training menu tab.
Training Tab> Power Curve (Summit Analysis Pack)
You need to have a Power Meter to use this feature
Also known as a critical power curve, this feature (only available to power meter users with Summit Analysis Pack membership) provides a picture of the maximal power you have sustained for a given period of time.
The Power Curve shows your best average power for time periods of 1 second up to the length of your ride. Strava searches your whole ride to find these best efforts and makes it easy for you to compare them with your best efforts for your previous 6 weeks, This year, previous years, or all-time,
From this screen, you can view and interact with your Power Curve. To make comparing different time periods easier, you can plot two different time periods separately on the same chart and customize the date range for each one.
Clicking to show Estimated FTP will display a dotted line to represent Strava's estimation of your Functional Threshold Power (FTP) with regard to each time period you have selected. You can also toggle between displaying Watts and Watts per Kilogram (assuming you have entered your body weight at your Profile Settings page).
Power goals that you have set will show up as small orange circles at the relevant point on your power curve.
Clicking on any point in the graph will 'focus' on that time interval and show a link to the activity during which your peak power for each selected time range was achieved. Simply click again anywhere in the chart to 'unfocus.'
Training Tab > Fitness and Freshness (Summit Analysis Pack)
Fitness & Freshness tracks your levels of fitness, fatigue, and form over time. The Fitness & Freshness chart is available to power meter or heart rate users with a Summit Analysis Pack. Any activities that include heart rate data are included in your Fitness and Freshness calculations.
What is Fitness and Freshness?
Fitness is the condition of your body to be able to complete a ride. The more you train the fitter you will be.
Freshness or “Form” is how fatigued you are. Lots of training will get you fit but this will negatively affect your freshness.
The concept of fitness and freshness is related to taper which involves reducing training before an event so that you to maintain your fitness but lose fatigue. In general, the overall numbers aren't as important as general trends.
Fatigue is easy to understand; it's the tired feeling that limits your performance. Strava models it in the same way as fitness, but over a shorter timescale. The score goes up quickly after a couple of hard days, and goes down just as fast when you take a few days off.
Being in form, or "peaking," happens when you are very fit but not fatigued. Strava models this as the difference between your Fitness Score and your Fatigue Score.
The Fitness & Freshness chart uses Training Load and/or Relative Effort to quantify your daily training. Training Load is calculated using power data and Relative Effort is calculated using heart rate data.
For Summit members with no power data available, we generate the chart using only Relative Effort. For those who have at least 10 rides with both Relative Effort and Training Load, the member-specific best-fit between the two is calculated and used to fill in Training Load for rides with heart rate but not power.
Viewing your Fitness & Freshness Graph
You can select the range of time represented by the graph, as well as enable plotlines to track your Fatigue and Form (more on those later).
Clicking on any point in the graph will 'focus' on that time interval - and show your specific Fitness, Fatigue, and Form values at that date.
Below the graph, you'll see the relevant activities that contributed to your Fitness values, as well as their Training Impulse. Simply click again anywhere in the chart to 'unfocus.'
Races are marked in red to help you analyze fitness over longer chunks of time. The fitness delta next to the fitness score will show how your fitness has changed over the last seven days.
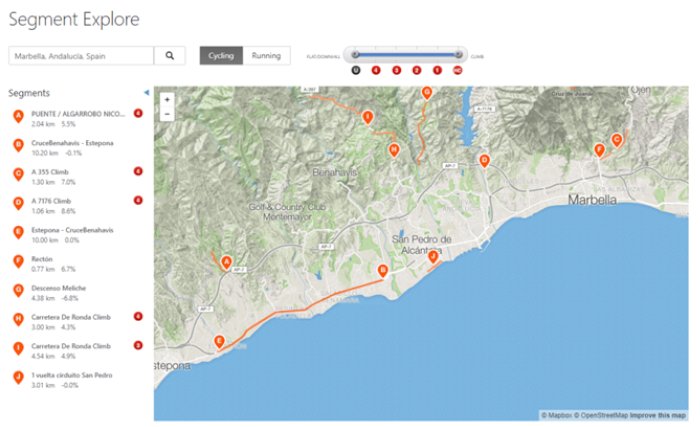
Explore Tab > Segment Explorer (Free)
Segment Explorer lets you browse segments in your area on a map. You can search by address or area and slider lets you filter by amount of climb (or lack of).
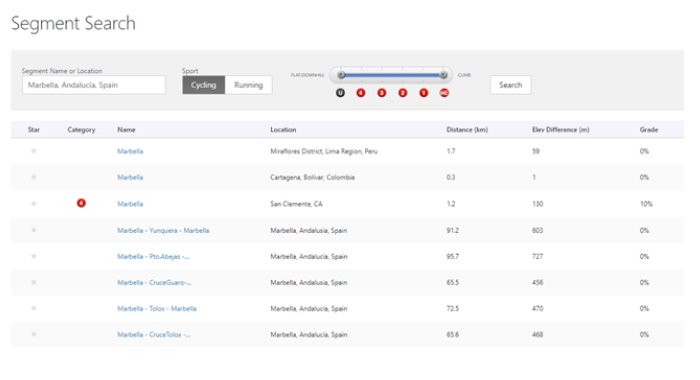
Explore Tab > Segment Search (Free)
Segment Search lets you browse segments in your area on a list. You can search by address or area and slider lets you filter by amount of climb (or lack of).
Explore Tab > Member Search (Free)
A key reason for the success of Strava, and the members who use it, is the social element which has been proven to improve motivation and performance.
You need to find people to follow and the easiest way is to search for friends using the global search tool, the magnifying glass icon.
Look for the search icon on the top bar above your feed, or under the Explore menu item. You can search for friends by location or by name.

Discover new friends using Strava's Suggested Members:
Browse through suggested profiles to discover new friends recommended by Strava.
Suggested members can be found in your Strava feed, under the Explore tab, or on your Profile on the mobile app. On your Profile on the website, go to the Following tab and select Who to Follow from the menu.
Find your friends using Facebook or your phone's contacts:
You can connect to your Facebook account to see a list of your friends that are already on Strava. On the mobile app, you can sync your phone's contacts to help you find and follow your friends.
How to invite friends to Strava:
From the Strava website, you can invite friends via email or Facebook. Select Find and Invite Your Friends from the feed, the Explore tab, or from the Who to Follow list on your profile under the Following tab.
From the Strava mobile app, you can send an invitation link to join Strava using your favourite SMS, messaging, email, or social app.

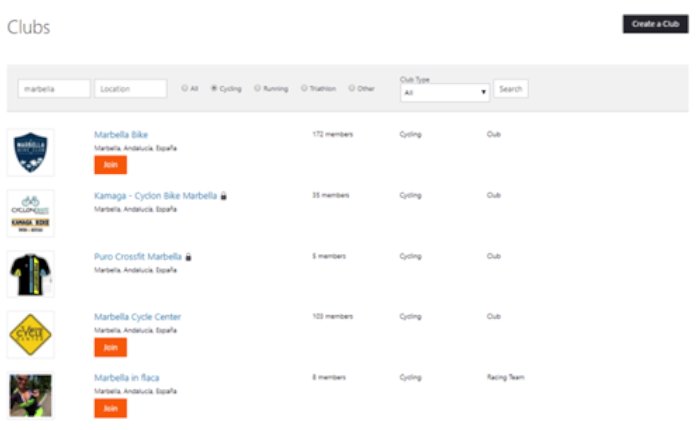
Explore Tab > Clubs (Free)
Club members ride further and longer. Any cycling, running, or triathlon club can be a Strava club from friendly groups and casual clubs to racing teams. You can join an existing club or start your own.
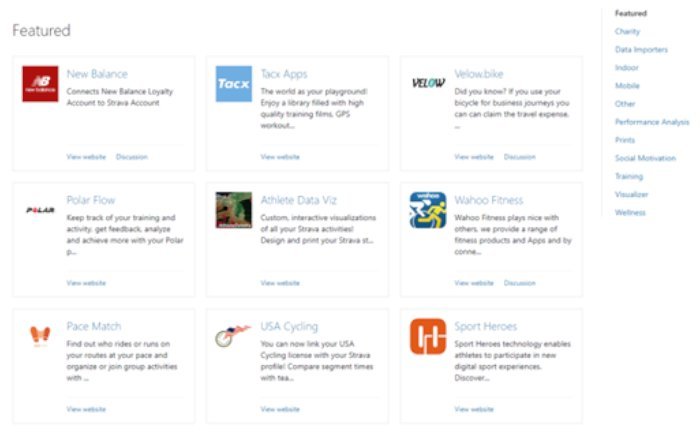
Explore Tab > Apps (Free)
There are thousands of third party apps available to enhance the Strava experience. They are listed under this menu item.
Strava do not approve or verify the compatibility or quality of these apps and they are supported by the app developers not by Strava.
Explore Tab > Running Races (Free)
Not relevant for cyclists.
Explore Tab > Local (Free)
Ride and run the best routes in the world with Stravas unique city guides. These Local routes are Hand-picked based on data from our global community and are curated by local members.
Explore Tab > Summit Perks (Summit All Packs)
Strava has negotiated special deals and discounts (Perks) with third party vendors.
If you have Summit membership you can take advantage of these offers which could mean your Summit membership is effectively free.
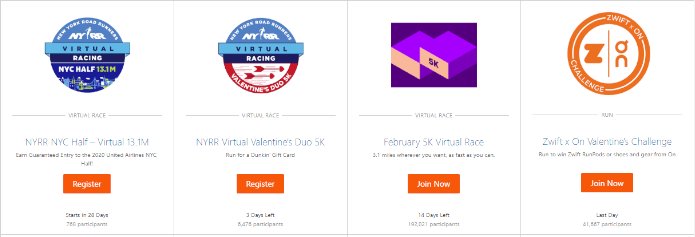
Challenges
Similar to Summit perks challenges are open to all members including free members.
Strava challenges reward you with special deals and discounts for meeting targets such as distance, speed or time spent on workouts.
Upload activities (FREE)
Under the + sign on the main menu this tab lets you set up compatible apps to upload to Strava. You can also upload compatible files (Works for multiple .tcx, .fit or .gpx files 25MB or smaller. You can upload up to 25 files in one go).
Segments and Achievements
What’s a segment?
Segments designate specific features or parts of a route. Each time you complete a segment, your time is recorded so you can compare it to previous efforts and those of your friends and other members.
Most of your activities contain pre-existing segments created and made public by other members. You can also create your own using the Create Segment tool found on your activity pages on the web.
What are achievements?
When you upload an activity to Strava, you will be awarded “achievements” for any outstanding performances on the segments you ride.
Here are the achievements Starva awards
Crown for King/Queen of the Mountain (KOM/QOM) or Course Record (CR)
The crown is awarded to the Number 1 performer on a given segment, Crowns are awarded to the fastest member to date on a segment’s overall leaderboard.
You can access a list of your "KOMs/CRs" or "QOMs/CRs" awards from your profile page on the web.
Trophy for a top 10 segment result
A trophy is awarded when you place in the top 10 of an overall segment leaderboard. There are trophies for 2nd to 10th place results.
Medal recognition for your top 3 personal bests
Medals are awarded for your outstanding personal performances. If you clock a new personal record on a segment, you'll receive a "PR" medal. You also get one for your second and third fastest times.
Strava Settings
My Profile > Name, Birthday, Gender, Location, Weight, Vanity URL, Profile Bio
My Account > Member Since Date, Membership Status, Cancel, Upgrade, Download (get an archive of your Strava data for your records), Delete Your Account
My Performance > Requires the Analysis Pack to monitor and analyse your heart rate monitor or power meter with features like Fitness & Freshness, Relative Effort, power analysis and more.
Display Preferences > Units & Measurements, Default Sport, Default Leaderboard View, Default Highlight Image
Privacy Controls > Use this page to set your privacy settings
Data Permissions > If you've denied Strava consent to process and store your health-related data your heart rate will be removed from activities uploaded on and after May 25th, 2018. Activities uploaded before this date will still display health-related data such as heart rate.
Allowing Strava to access health-related data
Strava will only collect and process health data from sensors you've connected or paired with Strava, from files you have manually uploaded to Strava, or from files you’ve imported from other services. This data is required for some features to work:
Heart-rate is shown on the mobile app record screen if you’re using a connected sensor
- Heart rate analysis and graphs
- Relative Effort
- Fitness & Freshness
- Denying Strava access to health-related data
Should you deny Strava consent to process and store this data, you will still be able to upload activities although health data will be removed and some features may not work.
Email Notifications > Control what emails you want to receive and what activites trigger an email notification
My Gear > Manage details of your Bike (s) this allows you to keep track of their mileage
My Apps > List of 3rd party apps that you have allowed to access your Strava data, you can revoke their access from this screen.
Partner Integrations > partner integrations let you link your Strava profile to select gyms, fitness studios and apps so your workouts will automatically upload to your feed. Current partner list here. https://blog.strava.com/gym-studio-sync/
My Badges > Embed code and graphics for you to add a Strava link to your blog or website
X-Features > X-Features are experiments that we've built that aren't quite ready for full integration into the site, but we want to share them so you can try them out! Features may be added, removed, or break at any time, so use them at your own risk. Enable or Disable them here
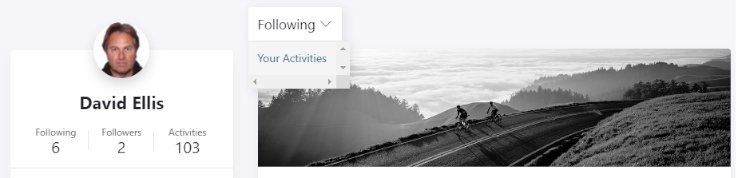
My Profile
The profile screen is really your Dashboard Tab that summarizes all your Strava metrics
- Number of Activities in the last 4 weeks in total and by day with the relative distance indicated by the circle size.
- Total number of hours by Activity type in each week
- Interactive Heatmap (Requires Summit Safety pack)
- Clubs that you are a member of
- Goals (Requires Summit Training pack) and link to training log
- Trophy Case Who you are following and King/Queen of maountain awards
- Achievements
- Your photo album where you can view as slideshow and delete images
- Histogram of rides by Time, Distance or elevation gain Weekly or monthly
- Details of last ride
- Social Stats – Following and Followers
- Key stats, last 4 weeks, This year to date and all time
- Button to generate embed code to share your rides on your blog or website
- Bike Details
Strava Summit Membership
Summit is Strava's premium programme designed to extend the Strava Free product with additional features. There are three Summit Packs: Training, Safety, and Analysis. You can subscribe to them individually or get a discount if you subscribe to all three. Subscriptions are available on a monthly or annual basis.
Summit Training
The Training Pack Focused on goal setting and metrics, it’s recommended for members who are preparing for a race or interested in getting in better shape. Features include Training Plans; Real-Time GPS Tracking for smartphones; Custom Goals by time, distance, power or segment to stay motivated; Race Analysis to break down pace fluctuations and splits; Filtered Leaderboards by age and weight; and breakdowns of KOM and PR attempts on members’ favorite Strava segments.
- Custom Goals: Stay motivated with personal time, distance, power and segment goals.
- Training Plans: Get plans from the best coaches in the business. Race Analysis - Detailed post-race breakdowns of your performance.
- Filtered Leaderboards: Level the playing field when you filter leaderboards by age or weight.
- Summit Perks: Get discounts from top brands, exclusively for Summit members.
- Summit Support: Enjoy expedited response times from dedicated Summit experts.
Summit Safety
The Summit Safety Pack helps members plan adventures on (or off) well-traveled routes, enjoy unique visualizations with Personal Heatmaps and stay safe while exploring.
- Beacon: Give friends and family peace of mind with private access to your live location during activities.
- Personal Heatmaps: Generate unique visualizations of all the places you’ve been active.
- Summit Perks: Get discounts from top brands, exclusively for Summit members.
- Summit Support: Enjoy expedited response times from dedicated Summit experts.
Summit Analysis
The Analysis Pack allows members to get the most out of any device they connect to Strava and you need it if you have a power meter.
- Relative Effort: Track your intensity across sport types, see your fitness trend and stay consistent with your training.
- Fitness & Freshness: Track your fitness over time and understand the impact of your training.
- Workout Analysis: Visualize your pace zones and lap data for all your run workouts.
- Live Segments: Compete against your best efforts or others’ in real time.
- Power Analysis: Make sense of your power meter data to assess your performance and fitness.
- Summit Perks: Get discounts from top brands, exclusively for Summit members.
- Summit Support: Enjoy expedited response times from dedicated Summit experts.
Strava Live Segments (Summit Analysis Pack)
You can check how you're performing on your target segments (starred) using your cycling computer or smartphone. Starred (Live) segments are synced automatically to your device, and you’ll be notified when you approach one of them during your ride.
Live Segments gives you instantaneous data on your current elapsed time, the distance left to go and whether you are up or down on your target time. Comparisons can be made against: Your personal best times, your friends’ times, and with the current KOM or QOM times.
Free and Summit members can use Live Segments, however, Summit members will see additional screens with comparison metrics.
Summit Members
When approaching a starred or popular segment, you will be taken from your recording screen to a Live Segment notification. You’ll hear an audible cue (if enabled) and see the segment name and your position relative to that segment.
When you pass into the segment, you'll see a bird's eye view where you can follow your avatar as well as the avatars for your PR (if one exists for this segment) and KOM/QOM/CR progress.
- red = avatar is ahead of you, you will be shown your time behind
- green = avatar is behind you, you will be shown your time ahead
- gray = avatar will turn gray if they are offscreen
- 50% mark = will display when you are halfway through the segment
The default is to compare you with your friends. If none of them have ridden the current sector, you’ll see a comparison against your own PR.
Final results are calculated and displayed as soon as the segment ends.
Free Members
when approaching a starred or popular segment you will hear an audible cue (a chime) if enabled, and see a notification.
When starting a segment you will see your current progress on a map, but won’t see comparison metrics (PR or KOM/QOM/CR)
When you complete the segment, you’ll be shown your final result and will be taken back to the normal recording experience.
The segment-explore feature shows top segments nearby which makes it easy to find challenges with plenty of competition.
How do I set up Strava Live Segments?
To set up your live segments log into Strava on a computer and ‘star’ the segments you want to appear as Live.
You can check here to see if Live Segments is compatible with your device.
Live segments is available to Strava Summit Analysis members.
What are starred vs popular segments?
Two types of segments will be used during your Live Segments experience: Popular and Starred. Popular segments will be determined by your location and Starred segments are selected/curated by you.
Starred segments are unique to each member. These are segments that you choose to follow by tapping the star icon next to the segment name.
Popular segments may change from activity to activity depending on the location in which you're active. Keep in mind that you can star a segment shortly before an activity in order to use that segment on that same activity. Unstarring a segment will, however, take up to 24 hours to get removed.
Why is my segment time different after I upload?
Note: The mobile app uses a different algorithm for determining when a member starts and finishes a segment than Strava uses for its leaderboard matches, which can affect the elapsed time reported for the segment. To ensure consistency between users, the times shown during an activity are preliminary, and the times shown on Strava after uploading are final.
Kudos and comments
In the same way that you may “like” a Facebook post or “favourite” a tweet, Kudos are a quick thumbs-up you can give to your friends and fellow members to congratulate them on a noteworthy activity, achievement, post, badge or challenge milestone. You can also leave a comment and they can reply to your comment.
Kudos is a great way to encourage and motivate people you would like to help.
From your feed, you can see how many Kudos have already been given and add your own. You can also give Kudos directly from the activity page or member post.
Click on the thumbs up to give Kudos. Once you give kudos the thumbs up will turn orange. To see the list of members who have previously given kudos, click on the number next to the Kudos icon.
To leave a comment, click on the Notepad icon to the right of the thumbs up.
Strava Privacy Controls
You can set your privacy settings from the privacy menu item under settings and also from your activity page. These are the three available privacy groups:
Everyone
Everyone on Strava can view this activity. This activity will be visible on segment and challenge leaderboards, and other Strava features.
Followers
Only your followers can access this activity's detail. This activity won’t appear on segment or challenge leaderboards. Members who don’t follow you may be able to view a summary of this activity depending on your other privacy controls.
Only You
This activity is private and only you can view it. No one will see it on your profile page, leaderboards or anywhere else on Strava, including group activities or Flybys.
Strava Labs - Interesting Projects:
Strava labs is a “Skunkworks” where Strava engineers design,test and share interesting ideas and concepts independently of the main Strava product
Projects can be added, removed or break at any time, so you use them at your own risk.
Strava Lab and engineering can be found here https://labs.strava.com/
and also on twitter: https://twitter.com/StravaEng
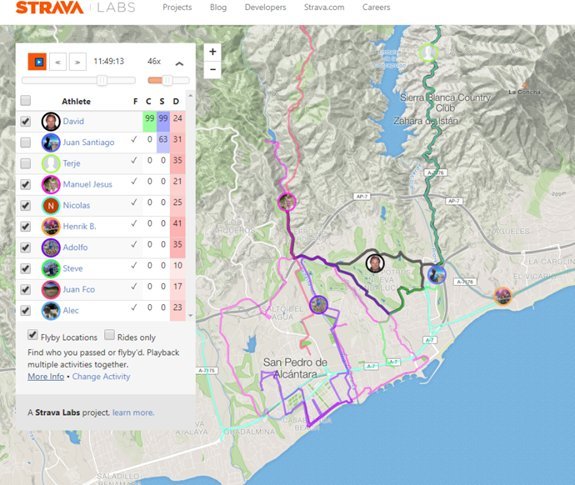
Strava Flybys by Strava Labs
Flyby is a Strava Labs tool that lets you playback your activity, as well as those near you, on a map and timeline.
You can visit Strava Flyby Here.
Strava Metro
Better Data for Better Cities
Strava Metro makes riding, running, and walking in cities better. Millions of people upload their rides and runs to Strava every day. Metro aggregates and anonymises this data and uses it in partnership with departments of transportation and city planning groups to improve infrastructure for bicyclists and pedestrians.
You can visit Strava Metro here.
Strava Global Heatmap
The heatmap is a unique resource that members can use to discover new places to workout.
The heatmap shows the density (popularity) of activities carried out by Strava users around the world and is based on the trillions of data points that Strava users create. The data goes back over the last two years and is totally anonymous.
The heatmap is updated monthly and users can opt out of contributing, when they do this their data will be removed at the next monthly update.
The heatmap is available to the general public, but only registered Strava members may zoom in to street-level details of activity on the heatmap.
Private activities don’t appear on the heatmap and any member can opt out of the heatmap by enabling the “Hide anonymized data in Metro and Heatmaps” privacy setting.
You can visit the Strava Heatmap here.
Strava hints and tips:
Beat the thieves
There have been cases of bike thieves targeting specific members bikes: tipped off to the location of expensive machines by rides logged on sites like Strava.
Go to the privacy tab on the settings page and create a "privacy zone" around your house, office or lock-up. Rides that start or finish in one of those zones will then be clipped so thieves can't work out exactly where your bike might be. The distance and average speed of your rides aren’t affected
Back-up your rides
You have a lot of valuable data on Strava it makes senses to keep it synchronized with another app. Strava links to many other apps or you can use Tapiriik to synchronize all your apps. https://tapiriik.com/
You can also request an archive of all your data by going to settings > my account and pressing the orange “Get Started” button under Download or Delete Your Account
Your archive will include activities, photos, posts, routes and more. It could take several hours to compile and a download link will be sent to your registered email address.
Using Strava as a connector between apps.
Because so many apps connect to Strava it’s a great way to automatically transfer data automatically between apps that don’t otherwise connect. (Of course you can always manually transfer files).
An example is getting data from theWahoo fitness app automatically into Golden Cheetah 3.5 via Strava.
You can also use Tapiriik to synchronize all your apps. https://tapiriik.com/
Strava King of the Mountain Club (3rd Party)
After realizing they were missing out on a number of challenges that hadn't been advertised, a group of Strava members created KOM.club to make sure they never missed out again!
KOM Club provides a fast and easy way to keep up to date will all Strava challenges and to discover segments you can steal
Pit yourself against other atheletes in our KOM, QOM and Challenge league tables
Members receive email notifications whenever a new challenge is released.
Related Strava Posts:

Leave A Comment
You must be logged in to post a comment.