Structured Workout Builder
On the calendar view click on the open book icon top left, then click on + New and workout (you can also create a new folder or use the existing, default “My Library” folder to store your workouts.
Click on Workout to open this view.

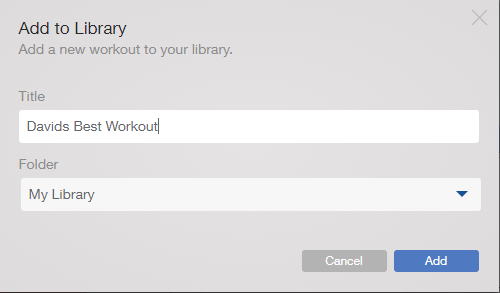
Give your workout a meaningful name and select a folder to save it in, the click the Add button.
You are transferred to this view.
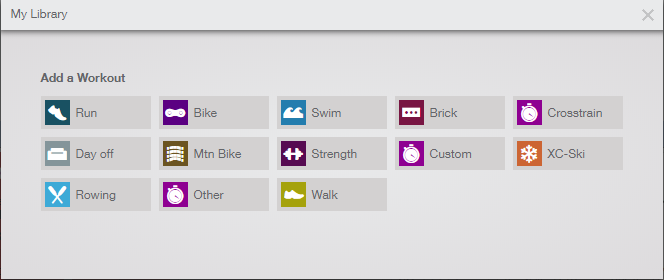
Select a Workout type. You are transferred to this view.
Clicking on the gear icon takes you to Quick views setup in account settings where you can add or remove items from the planned/completed column.
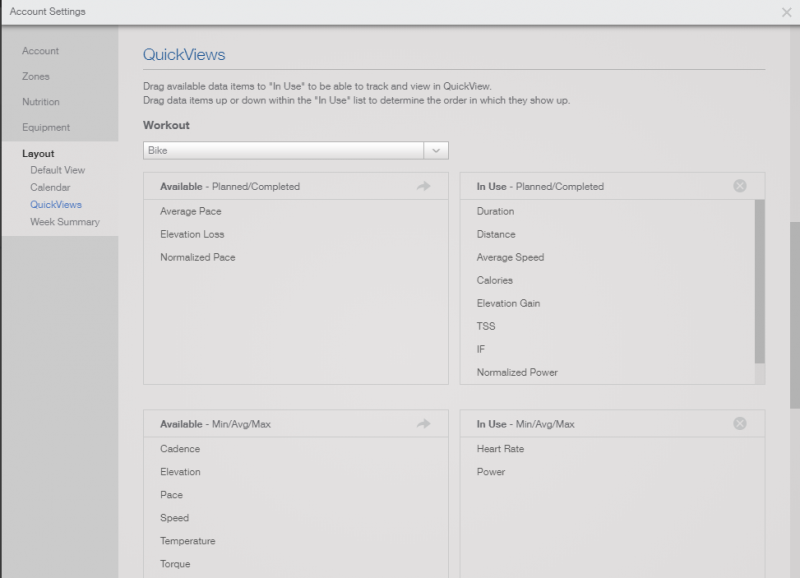
Drag available data items to "In Use" to be able to track and view in Quick view.
Drag data items up or down within the "In Use" list to determine the order in which they show up.
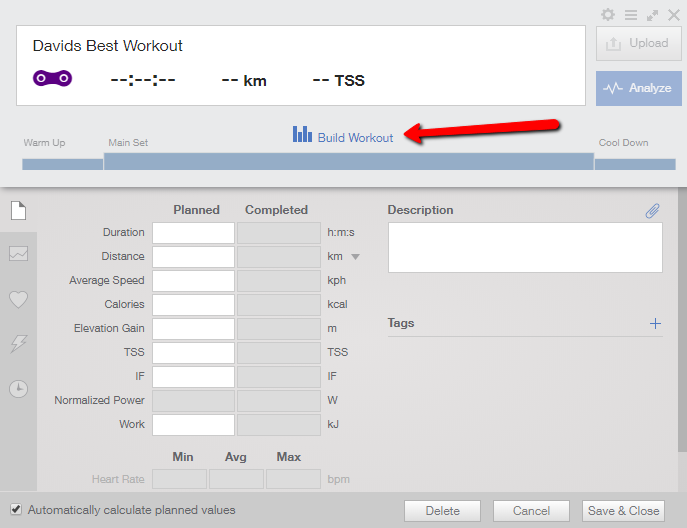
Once you are happy with the planned items layout (either the default or the changes you made to the quick view), click on the build workout button.
Now you see this popup:
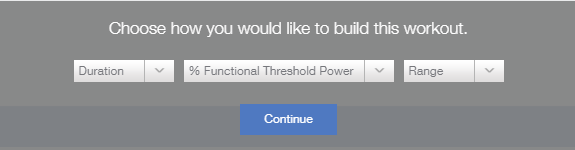
Your options are:
Left
- Duration
- Distance
Middle
- % Functional Threshold Power
- % Maximum Heart Rate
- % Threshold Heart Rate
- % Threshold Speed
- Rating of Perceived Exertion (RPE)
Right
- Range
- Target
Choose your preferred options and click continue. You are now taken to the blank workout builder view.
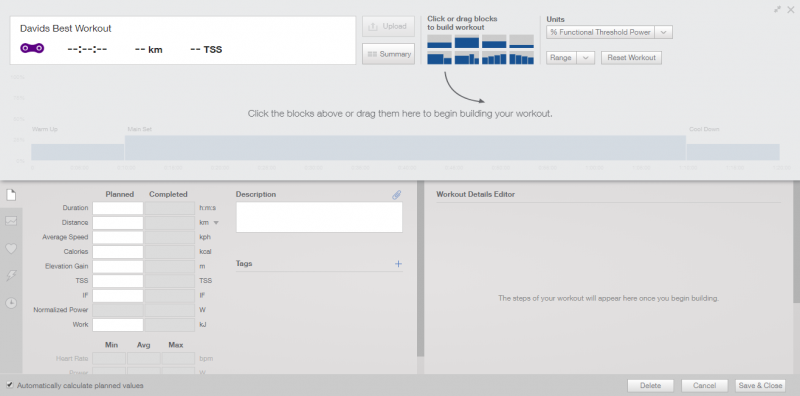
At the top of the screen is a drag and drop editor to build the workout using training blocks. Below this you will see the training detail section on the left and the Training detail section on the right.
In the block builder section are 8 blocks, each representing an element of your workout.
The 8 blocks are:
Top Row: Warm Up, Active, Recovery, cool down.
Bottom Row: Two Step Repeats, Three Step Repeats, Ramp Up, Ramp Down.
Click on the block you want to use and drag it into the area below to start building the workout.
Note: Blocks are NOT put in the correct logical order automatically so you need to make sure the order makes sense to you. For example it is possible to put ramp down BEFORE an Active block which may or may not make sense depending on what happens next.
Increase/Decrease Block Duration
To increase or decrease the block duration Hover over the vertical dividing line between blocks until the 4 headed arrow changes to a 2 headed arrow, left click and drag left/right to decrease/increase duration.
Hover over a block to see a tooltip with block metrics. Where relevant a Minus/Plus box also appears allowing you to increase or decrease the number of steps in this block.
Hovering over a block shows a rectangle and a cross in the top right hand corner, clicking the cross deletes the block.
Clicking on the rectangle and holding the left mouse button down while dragging left or right makes a copy of that block.
As you add blocks Trainingpeaks builds your workout for you.
Leave automatically calculated planned values checked (Automatically calculates: planned duration TSS, IF, distance and pace).

Workout details editor
This is a list of the workout tiles in the block editor at the top of the view; you can edit the values here. Click on the block in the block editor to highlight the relevant box here.
You can add a cadence range; click on the blue + cadence range the range value is automatically populated. Click in the grey x to remove the cadence range.
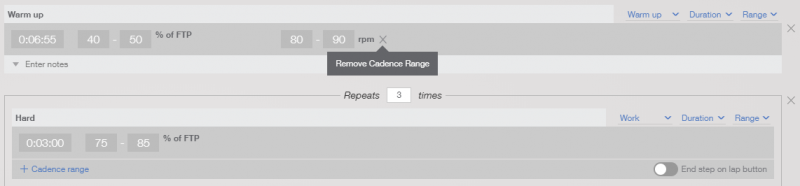
On the top right of each box are three dropdowns to change parameters:
- Warm Up
- Work
- Recover
- Cool Down
- Duration
- Distance
- Range
- Target
Hovering over the box reveals an area below that box where you can add notes.
Clicking on any of the dark grey boxes lets you edit the parameters in that field.
Don't forget to add a FULL description of the workout.
End Step on lap button: You can also set specific steps to “End on Lap button”, which will allow that step to continue on your compatible device until the lap button is pressed to advance to the next step. This is referred to as an open ended step.
“Open-ended steps in the Structured workout builder help provide you with the flexibility to more effectively follow your structured workout by allowing you to choose when to advance to the next step in your workout”.
When "End step on lap button" is selected for a given step in a Structured Workout then that step will continue to display (the target power, heart rate, or pace will not change and the lap timer won't reset) until you hit the lap button on a compatible device. This option can be set for each step in a workout to help you adjust your workout to the variables that may interfere with riding outside or to the specific demands of the workout. Some ways that you can use open-ended steps include.
Plan a warm-up with a minimum duration and an open-ended step so you or your athlete can make it to an ideal stretch of road before starting the main workout intervals regardless of traffic.
Set approximate work interval durations with open-ended steps to use hills or other terrain features to perform intervals.
Set the recovery intervals to be open-ended to do "full recovery" or heart rate drop or RPE based recovery before starting the next interval.
Set the last step as open-ended to allow additional riding time without the activity ending.
It is still recommended to set the duration for an open-ended step as close as you can estimate to the actual duration is as not all devices support open-ended steps and the set duration is still used to calculate the planned TSS and other values.
Structured workouts adapt automatically to athletes’ performance changes
When a structured workout is added to an athlete's calendar the prescribed heart rate or power targets and the target zone are automatically calculated based on the athlete's current threshold and zones settings for that workout type.
This means that an athlete can continue to use the same workout as their threshold or zones settings change over time.
For coaches this means they can use the same workout for all of their athletes without having to calculate individual targets for each athlete.
A workout built with the Workout Builder in a Coach's library can also be converted from one intensity to another.
Changing the intensity of a workout will update the current workout. If multiple workouts with the same structure but different intensities are needed simply create a copy of the workout, rename it and then change the prescribed intensity.
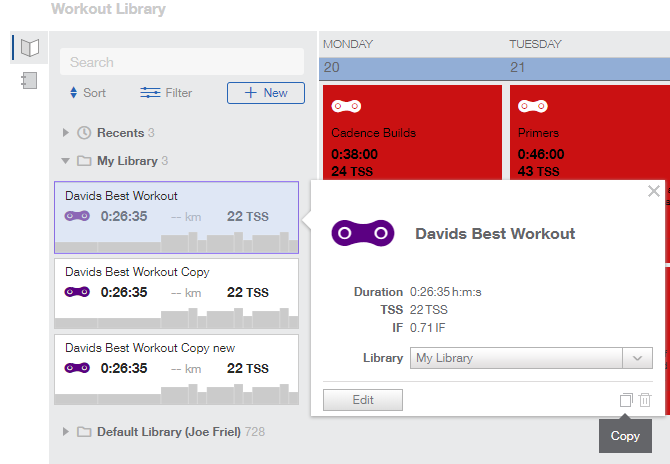
How to open an existing structured workout for editing
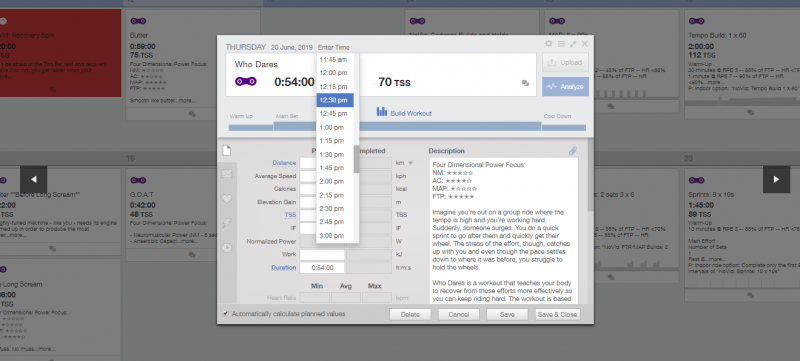
In the calendar or workout library views Click on a workout to open the popup shown above. You will see Previous/Next buttons either side of the popup to view those workouts.
Click on Enter time at the top of the popup to enter your start time
Click on any of the training blocks to open the full size workout builder and start editing it.
Don’t forget to make a copy if you want to keep the original.
To make a copy workout go to the library (Icon top left of calendar page) click on workout and click on the copy icon bottom right.
How to export a structured workout
Workout files exported from TrainingPeaks are compatible with most indoor training applications and compatible Garmin and Wahoo (ELEMNT and ELEMNT BOLT) devices.
Workouts can be exported in .ERG, .MRC, .FIT, or .ZWO formats.
You can see a full list of compatible devices here
To export a workout that has been built with the Workout Builder, simply click the 'Export' button in the upper right corner of the Quick view.
The easiest way to use your TrainingPeaks workouts in Zwift is with the automatic workout sync. This will sync your workout for today directly to your list of workouts in Zwift.
You will only need a .zwo file if you want to save a workout from TrainingPeaks permanently into Zwift so that you can use it whenever you want.
Once you have downloaded the .zwo file you can drag it into the Workouts folder in "Documents > Zwift > Workout.
More details on exporting structured workouts can be found here.
How to upload a completed workout
There are several ways you can upload your workout files into TrainingPeaks.
Within the workout quick view window in TrainingPeaks
This option takes a few more steps, but is safer if you want to make sure that your completed workout file is used to update the correct workout on your calendar if you have more than one workouts of the same type on one day.
To upload workout files directly to a planned workout on your TrainingPeaks calendar:
Click on the target planned workout on your TrainingPeaks calendar. Or, if none exists, click the "+" button on the correct day to create a new workout to upload to.
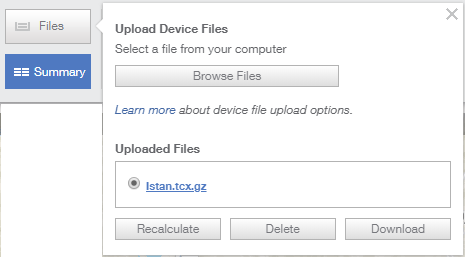
When the quick view window opens, click the "Upload" button top right.
A file browser window now opens. Browse for the desired workout file. Note: Your device must be plugged into your computer or the file must be saved locally on your computer.
By dragging and dropping the file onto your TrainingPeaks calendar
You can safely use this option if you have only one workout per day, or two or more workouts of different types (for example a swim and a run).
To upload workout files by drag and drop:
Drag the saved file onto your TrainingPeaks calendar and it will land on the correct day and pair with any planned workout of the same type (swim, bike, run) on that day.
(Strength workouts in .fit format will not automatically pair with planned strength workouts so they should be manually uploaded to the correct planned workout).
How to review a completed workout
When you complete a workout it may be updated by your connected device. Or you may need to upload it manually.
The workout tile on the calendar will change color to orange.
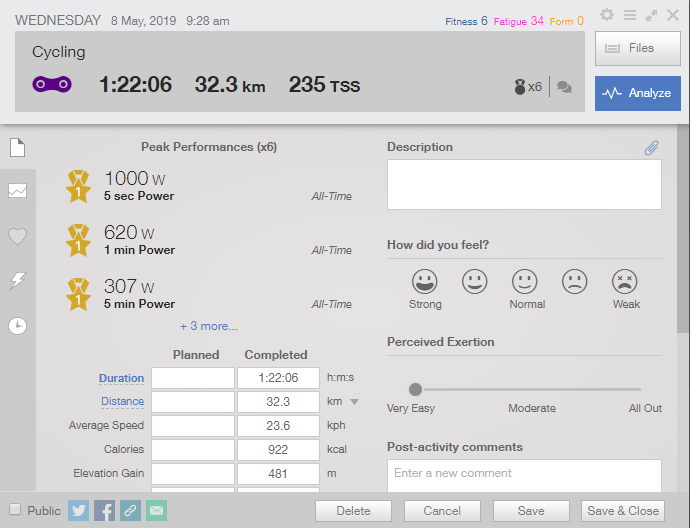
Clicking on a Workout (after it has been updated) in the calendar or library will open this popup with 4 Tabs on the left hand side showing these metrics:
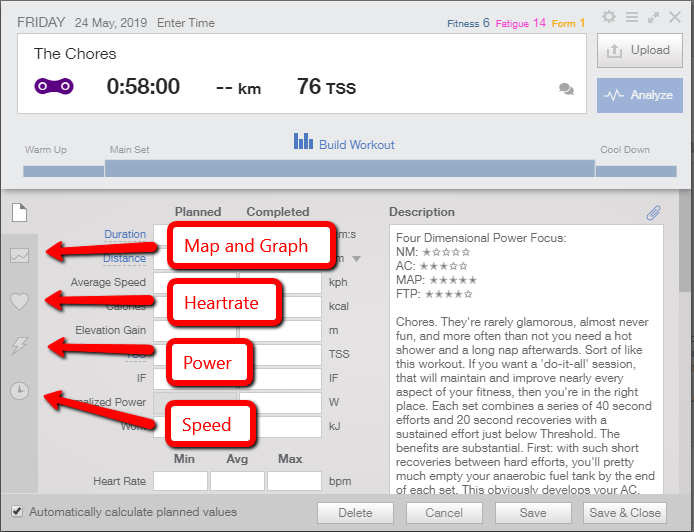
Map and Graph, Heart rate, Power and Speed
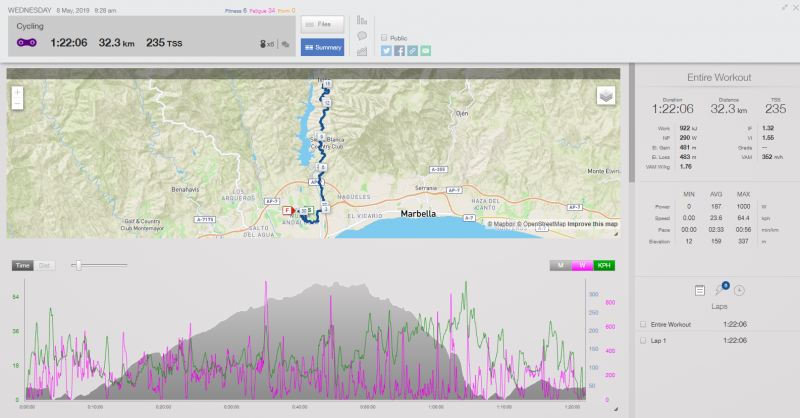
Clicking on the Analysis Button brings up the main analysis view which is split into 5 areas as follows:
Header Area
Date, Fitness/Fatigue/Form values
Duration, Distance, TSS, Peak Performance medals
Files Button: Upload/Download/Delete files or recalculate workout statistics.
Summary Button: Transfer to the quick view screen (Click analyze in the click view screen to return to the main view above.
![]()
![]()
![]() Add a Chart from the chart Library
Add a Chart from the chart Library
Add Comments for this workout
Apply Elevation Correction to make your GPS data more accurate
Make Public: Share this workout on Social Media
Map Area
Time and distance chart for the workout
Analysis charts you have chosen to display
Workout summary view of key metrics
Workout Builder
On the calendar view click on the open book icon top left, then click on + New and workout (you can also create a new folder or use the existing, default “My Library” folder to store your workouts.
Click on Workout to open this view.
Give your workout a meaningful name and select a folder to save it in, the click the Add button.
Select a Workout type and you are transferred to this view.
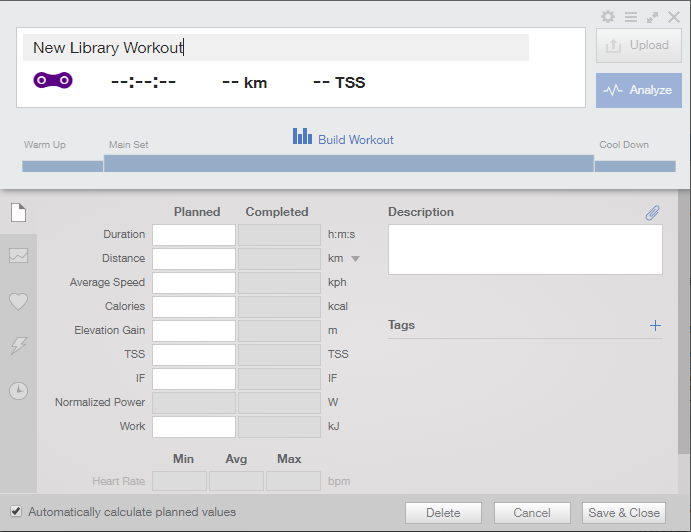
Leave automatically calculate planned values checked (Automatically calculates: planned duration TSS, IF, distance and pace)
Clicking on the gear icon takes you to Quickviews setup in account settings where you can add or remove items from the planned/completed column.
Drag available data items to "In Use" to be able to track and view in QuickView.
Drag data items up or down within the "In Use" list to determine the order in which they show up.
Once you are happy with the Planned items layout (either the default or the changes youmade to the quickview, click on the build workout button.
Now you see this popup:
Your options are:
Left
• Duration
• Distance
Middle
• % Functional Threshold Power
• % Maximum Heart Rate
• % Threshold Heart Rate
• % Threshold Speed
• Rating of Perceived Exertion (RPE)
Right
• Range
• Target
Choose your preferred options and click continue. You are now taken to the blank workout builder view.
At the top of the screen is a drag and drop editor to build the workout using training blocks, below this you will see the training detail section on the left and the Training detail section on the right.
In the block builder section are 8 blocks, each representing an tile of your workout.
The 8 blocks are:
Top Row: Warm Up, Active, Recovery, cool down
Bottom Row: Two Step Repeats, Three Step Repeats, Ramp Up, Ramp Down
Click on the block you want to use and drag it into the area below to start building the workout.
Note: Blocks are NOT put in the correct logical order automatically so you need to make sure the order makes sense to you. For example it is possible to put ramp down BEFORE an Active block which may or may not make sense depending on what happens next.
Increase/Decrease Block Duration
To increase or decrease the block duration Hover over the vertical dividing line between blocks until the 4 headed arrow changes to a 2 headed arrow, left click and drag left/right to decrease/increase duration.
Hover over a block to see a tooltip with block metrics. Where relevant a Minus/Plus box also appears allowing you to increase or decrease the number of steps in this block
Hovering over a block shows a rectangle and a cross in the top right hand corner, clicking the cross deletes the block
Clicking on the rectangle and holding the left mouse button down while dragging left or right makes a copy of that block.
Workout Details Editor
This is a list of the workout tiles in the block editor at the top of the view, you can edit the values here. Click on the block in the block editor to highlight the relevant box here.
You can add a cadence range, click on the blue + cadence range the range value is automatically populated. Click in the grey x to remove the cadence range.
On the top right of each box are three dropdowns to change parameters
• Warm Up
• Work
• Recover
• Cool Down
• Duration
• Distance
• Range
• Target
Hovering over the box reveals an area below that box where you can add notes.
Clicking on any of the dark grey boxes lets you edit the parameters in that field.
End Step on lap button: You can also set specific steps to “End on Lap button”, which will allow that step to continue on a compatible device until the lap button is pressed to advance to the next step.
This is referred to as an open ended step.
“Open-ended steps in the Structured workout builder help provide you with the flexibility to more effectively follow your structured workout by allowing you to choose when to advance to the next step in your workout”.
When "End step on lap button" is selected for a given step in a Structured Workout then that step will continue to display (the target power, heart rate, or pace will not change and the lap timer won't reset) until you hit the lap button on a compatible device. This option can be set for each step in a workout to help you adjust your workout to the variables that may interfere with riding outside or to the specific demands of the workout.
Some ways that you can use open-ended steps include:
Plan a warmup with a minimum duration and an open-ended step so that you or your athlete can make it to an ideal stretch of road before starting the main workout intervals regardless of traffic
Set approximate work interval durations with open-ended steps to use hills or other terrain features to perform intervals
Set the recovery intervals to be open-ended to do "full recovery" or heart rate drop or RPE based recovery before starting the next interval
Set the last step as open-ended to allow additional riding time without the activity ending
It is still recommended to set the duration for an open-ended step as close as you can estimate to the actual duration is as not all devices support open-ended steps and the set duration is still used to calculate the planned TSS and other values.
Structured workouts adapt automatically to athletes’ performance changes.
When a structured workout is added to an athlete's calendar the prescribed heart rate or power targets and the target zone are automatically calculated based on the athlete's current threshold and zones settings for that workout type.
This means that an athlete can continue to use the same workout as their threshold or zones settings change over time.
For coaches this means they can use the same workout for all of their athletes without having to calculate individual targets for each athlete.
A workout built with the Workout Builder in a Coach's library can also be converted from one intensity to another.
Changing the intensity of a workout will update the current workout.
If multiple workouts with the same structure but different intensities are needed simply create a copy of the workout, rename it and then change the prescribed intensity.
Clicking on a Workout (after it has been completed) in the calendar or library will open this popup with 4 Tabs on the left hand side showing these metrics: Map and Graph, Heartrate, Power and Speed.
How to open an existing structured workout for editing
In the calendar or workout library views Click on a workout to open the popup shown above. Click on any of the training blocks to open the full size workout builder and start editing it.
Don’t forget to make a copy if you want to keep the original.
To make a copy workout go to the library (Icon top left of calendar page) click on workout and click on the copy icon bottom right.
How to Export a Structured Workout
Workout files exported from TrainingPeaks are compatible with most indoor training applications and compatible Garmin and Wahoo (ELEMNT and ELEMNT BOLT) devices.
Workouts can be exported in .ERG, .MRC, .FIT, or .ZWO formats.
You can see a full list of compatible devices here
To export a workout that has been built with the Workout Builder, simply click the 'Export' button in the upper right corner of the Quick View.
The easiest way to use your TrainingPeaks workouts in Zwift is with the automatic workout sync. This will sync your workout for today directly to your list of workouts in Zwift.
You will only need a .zwo file if you want to save a workout from TrainingPeaks permanently into Zwift so that you can use it whenever you want.
Once you have downloaded the .zwo file you can drag it into the Workouts folder in "Documents > Zwift > Workout
More details on exporting structured workouts can be found here
Note on Peak Performances
Peak Performance Medals show when you set a new personal best (PB) or other top three results for power, heart rate, and pace by distance for the current year and for your entire workout history in TrainingPeaks.
On the calendar workout tile, a blue medal icon and number indicates how many Peak Performances you achieved during that workout. (Peaks are only available for Bike, Run, and MTB activities).
Opening the workout shows the Peak list area, click on the + more link to see all of the Peak Performances set for that workout.
You can click on a specific Peak Performance to open the expanded analysis view.
You can compare any Peak Performance to other performances (either from that year or all-time). Click "compare" next to that Peak to open your Peak Performance history. Now filter by type, duration, and sport to find a comparable peak.
You can remove a Peak Performance from the list by clicking the "x" to the right of the workout in the list of Peak Performances. This doesn’t delete or change the data, it just removes the workout from the peaks list.

