The Garmin Connect app is designed to be used to with Garmin devices but it can be used with iPhone and Android smartphones and has some nice features that are much more user friendly than some other training programs.
If you don’t have a Garmin or other compatible device you’ll need to manually upload your activities but this is really easy.
I downloaded a tcx file from Strava and dragged it into the Garmin file upload box in less than 20 seconds.
You can sign up for a free Garmin Connect account here
Here’s a detailed feature list based on the Garmin Connect Menu Structure:
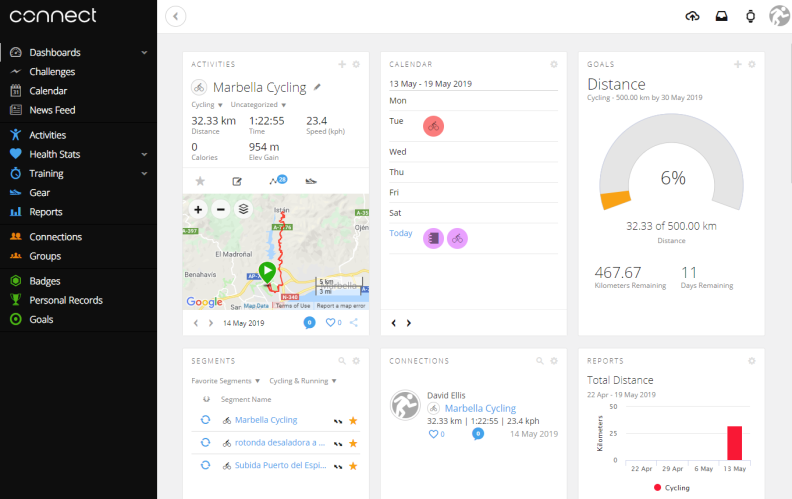
Dashboards
As the name suggests this is mission control for your training regime. Key data from various elements such as Calendar, Goals, Reports, Devices, and Training Plans are displayed on tiles.
Click on the top left of a tile to drag it to a new position.
Click on the gear icon top right to change parameters, open the element full view, or change dashboards.
There’s a default dashboard to get you started, you can easily customize this or create your own by selecting elements from a menu.
Challenges
If you have a device that tracks steps, you can participate in challenges with other Garmin Connect users. Each week a new challenge begins during the night between Sunday midnight and Monday noon (your own time zone).
As your steps add up throughout the week, you’ll see your rank with the other 7-12 participants in your challenge group.
Calendar
Your Calendar shows Events, Goals, Workouts, Activities and Training Plans. You can select Weekly Monthly or Yearly views.
Clicking on an entry takes you to the view for that entry.
Clicking on a date lets you manually add an entry.
Options for manually adding entries are:
- Event
- Goal
- Workout
- Manual Activity
- Note
- Weight
Clicking on any of these options opens a dialog box which allows you to create that entry.
Publish Your Calendar
You can also publish your calendar so you can view your scheduled workouts, races, and events in web calendars such as Google Calendar or calendar applications such as Apple Calendar.
Publishing your calendar will create a unique address, allowing you or others to subscribe to your calendar. Notes and weight logs aren’t published.
News Feed
This is your activity feed or timeline.
Activities
Your activities and workouts are listed here, they may have been automatically added by your compatible device, you can manually enter an activity or you can import an activity file created by another program.
You can upload files in these formats:
- Garmin Activity Files (.tcx, .fit or .gpx format).
- Fitbit® body or activity data (.xls, .xlsx or .csv format).
You can also export a csv of all the activities which will include all the recorded metrics.
The activity summary listing shows metrics per activity. You can change these by clicking on “Edit Activity Metrics” on the far right (hover over the row far right to see the icon). You can revert to the default setting if you need to.
You can change the title of any metric by clicking on the pencil to the right of it
Clicking on the title of an activity takes you to the full view which is very similar to the Strava activity view.
The Main Activity View displays these elements:
Map of Activity
Charts: showing key metrics for entire activity
Segments: Rank, name, time, speed, star/un-star, show on map/hide on map toggle
Other tabs
Stats, Splits, Power Curve (Compare this activity's power data to your power curve).
Health Stats
Weight
Manually enter your weight as it changes, automatically calculates your BMI. You can set a weight goal and a line chart shows your progress towards your goal. This view keeps a historic track of your progress.
Calories In/Out
The default view is Calories In/Out
These Calorie details are as recorded by you myfitnesspal.com account
You need to Connect Garmin Connect to your MyFitnessPal account, if you don’t have an account it is easy to set up a free account.
There are also tabs for these additional views:
Timeline: This shows a timeline of events such as activities, sleep etc.
Step Details: Step details as recorded by your device.
Sleep: Sleep details as recorded by your device.
Activities: Activities from your device or that you have uploaded.
Breakdown: Percentage of your day when you have been: Highly Active, Active, Sedentary, Sleeping.
There are free text fields for “how was your day” and comments.
Training
Workouts
Create your own workouts and send them to your device and add them to your calendar.
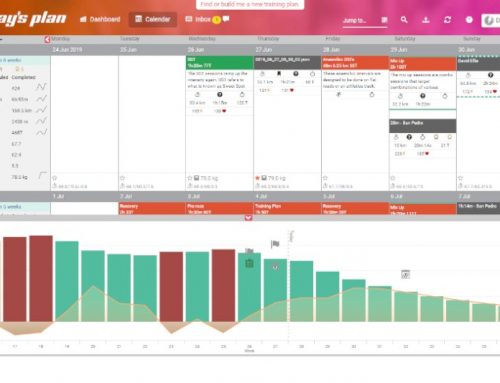
Training Plans
There are 114 Training plans (78 Cycling plans) available free of charge. You can browse these on Garmin Connect, choose one that you want to follow and select a start date. It will be automatically added to your calendar and your compatible device.
The plan view lets you edit training details or delete training days. It doesn’t let you reorder them though.
This view also shows you today’s and future activities but not previous days.
If you create a workout and add it to the calendar on a training plan day you get the chance to make it a one-time workout. Or, you can add it to the training plan and see the workout every time you schedule the plan.
Plans are available based on activity type (cycling, running, triathlon), Event type and level.
Courses
Similar to Strava Routes, Courses lets you build a cycling route or open a route created and made public by someone else from the Garmin Connect course library based on your geolocation or a location you manually enter.
Search existing courses by Location, Course type, Distance, Elevation Gain.
You can send your course to a compatible device, share a link with friends or embed it in a website or blog download it as a GPX or FIT file.
You can also duplicate it for editing.
Options include
- Map type: Flat, Satellite, Terrain
- Show/Hide Bike lanes and trails
- Show/Hide Kilometer markers
- Show/Hide Course Points
- Show/Hide Popularity Heatmap
- Add it to your favorites
Create a course
There are two ways to create a course: custom or round trip. The default is custom but round trip is the easiest.
When creating a round trip course you can switch to custom by clicking on the 3 dots to the right of the round trip title.
To create a round trip course
Go to course and click the blue create a course button
Select a course type: eg: Road cycling, Mountain biking
Select Round Trip as the drawing method then click continue
Specify distance and start direction
Click on the map to add your start point. Garmin Connect will then create a round trip that meets the distance and start direction values that you specified in the previous step.
Before you save the course don’t forget to give it a name, the default is “untitled” click on the pen next to this to rename it.
You can make your course private or public, the default is private.
It’s usually better to create a custom course so you should read the next section now.
To create a custom course
Go to course and click the blue create a course button
Select a course type: eg: Road cycling, Mountain biking
Leave the drawing method as custom then click continue
You have 3 choices
- Route popularity - Good
- Follow Roads - Good
- Freehand – Not so good, this can go badly wrong.
Click on your chosen start point which drops a green map pin. Click on end point which drops a red map pin. You can click on either map pin and drag them to a new position on the map if you want to.
Now choose if, and how, you want to return to the start from the options panel:
(Undo takes you back/deletes one step every time you click it)
- Undo
- Loop to start (Complete a circuit)
- Out and back (return along your outbound route)
- Reverse Direction (Switch start and end points
- Add a course point
Loop to start: This will try and create a circular route wherever possible, but if none exists it will send you back along all or part of your route out.
Out and back: Return along your outbound route.
Reverse Direction: Switch start and end points.
Once you have created your route you can click on it and drag that section to another part of the map, for example to increase or decrease the distance, or to visit a particular location. When you do this the map will automatically redraw.
Add a course point
You can create a course point and add it to your course. Your device will then tell you when you approach this point during the activity
Click on “add a course point” and then click on the course where you want it to appear. Choose an option and give it a title or use the default title and save the course point.
The expand link shows a large trace of the route elevation at the bottom of the view to help you find where to put the course point.
Options for course point types are:
General
- Generic
- Food
- Water
- First Aid
- Danger
- Summit
- Valley
Cycling
- Sprint
- HC Climb
- Category 1 Climb
- Category 2 Climb
- Category 3 Climb
- Category 4 Climb
You can use the pace calculator to set a goal time and speed. Enter your goal speed and hit return, the goal time will be automatically calculated. Or enter your goal time and hit return, the goal speed will now be calculated.
Before you save the course don’t forget to give it a name, the default is “untitled” click on the pen next to this to rename it.
You can make your course private or public, the default is private.
Segments
Segments are short sections, usually between two landmarks that are popular for gauging performance, for example time up a climb or a sprint to a sign.
You can create your own segment or search for an existing nearby segment.
To Search for a nearby segment: go to nearby segments and enter the location you want to search and optionally choose:
- Activity Type
- Segment Type
- Surface
- Distance
- Avg Grade
To create your own segment: Go to an existing activity, scroll down to the segments and click on create segment. Use the tools to create the segment and save it.
If you now go to the segment menu item (under training) you will see this new segment appear under “your segments” and it will show on your future activities.
Segment Leaderboard
This shows the following Metrics: Rank, Participant, Time, Avg Speed (kph), Power (W), Wind, Date
You can filter results by:
- Everyone
- My Connections
- Me Only
Then filter by
- Sex
- Weight groups
- Age Groups
- Cycling Classes
Popularity Heatmap
This shows how popular roads and trails are. Enter a location to see heatmaps for that area.
Gear
Add your training gear and (optionally) have it automatically added to relevant new and previous activities.
You can also add a target distance for the equipment. You could use this to track service intervals or when it’s time to retire this piece of kit and buy yourself something new.
Reports
Garmin Connect has the following built in reports which can be displayed for the last 7 Days, 4 Weeks, 6 Months, or 12 Month period.
- Activity Calories
- Average Bike Cadence
- Average Heart Rate
- Average Pace
- Average Power
- Average Speed
- Functional Threshold Power
- Max 20 Min Avg Power
- Max Heart Rate
- Normalized Power®
- Power Curve
- Total Activity Time
- Total Distance
- Training Effect
- Training Status
- TSS®/IF®
- VO₂ Max (Cycling)
- Progress Summary
Connections
Connections are the friends you have on Garmin Connect.
You can see their activity Feed and they will appear in the weekly totals leaderboard. You can also compare Badges.
You can search Garmin Connect for people you know and send them a Connection request as well as Connecting to Facebook and Google to see if you have any friends there who are also on Garmin Connect.
Groups
If you lead a social club, coach a cycling team, want to team up with like mined athletes or have a lot of active friends who like to stay in touch Garmin Connect Groups lets you to coordinate everyone’s activities in one place. It’s similar to Strava Clubs.
You can search for and ask to join an existing group or start your own.
The Groups area features these sections:
- Activity Feed, both posts and activities, group announcements
- Leaderboards
- Challenges
- Member listing with location and Connect request buttons
- Group Calendar showing group events
- Courses (Your group administrator can add courses for your whole group to use)
Badges
Badges are rewarded for completed activities; some of these are very basic, like recording your weight. Others are more challenging, for example: Have an overall L/R balance of 50/50 on Vector pedals.
You can see which badges you have earned and which badges are available to you.
Badges mean points and when you have enough points you move up to the next level. I’m not sure how many badges or levels there are, but if you aim for level 4 and are fairly active this should keep you busy for 3 or 4 months.
Points from badges contribute towards a score that is displayed in your Connections Leaderboard. This leaderboard includes all Garmin users that you are connected to.
If you click on their names, you'll be able to view the badges they've earned and find out which ones you need to get to catch them up.
Personal Records (PB)
Personal records or a personal bests (PBs) are how athletes measure your milestones.
Personal Records are created when you upload data that closely matches one of our predetermined distances, and it's the fastest time you've ever uploaded for that distance.
You don't have to exactly match a distance, but it must be close. (For example, a Half Marathon Personal Record may be created if your activity is 13.2 miles.)
Garmin Connect only scans for a Personal Record the first time an activity is uploaded, so an edited activity won't be listed as a Personal Record.
Goals
Goals are a great motivational tool; everyone needs something to aim for! Garmin Connect makes it really easy to set goals which will appear in your calendar and your dashboard letting you easily track your progress.
To create a new goal you need to set these parameters:
Goal Name
Activity Type
Goal Type
- Distance
- Hours
- Calories
- Activities
Target (Value of Goal Type you want to hit for example: 100 Miles)
Duration (Time allowed to meet your Goal for example: 1 Month)
Start Date
You can edit or delete your saved goal after you have saved it.
Top Menu
Upload or import activity
You can pull data from other accounts or activity trackers into Garmin Connect
Requests and Notifications
System Messages and Action log
Devices and Sync Status
Transfer information to and from your device, including activities and software updates, with Garmin Express or Garmin Connect Mobile.
Profile and Accounts
View Profile: View a short summary of key metrics, clicking on edit profile takes you to the account settings screen.
Account Settings: All your information, Athlete Measurements, preferences, privacy settings, public profile etc.
Help: Link to the Garmin Connect website support page
Sign Out
Privacy Zones
In your privacy settings you can create a privacy zone around an address, such as your home, to hide your start point on publicly shared activities. It’ll also hide your end point if you finish inside the zone. You’ll always see your full route, but others will only see the middle of the route.
